Showing posts with label Tips and Tricks. Show all posts

Opera Adblock--How to Block Advertisement in Opera Web browser

Update related to Opera Adblock:-Now True ad blocking feature is available in Opera Web Browser you can get opera adblock Add-on at https://addons.opera.com/en/addons/extensions/details/opera-adblock/0.52/ .or you can check out more adblock addons at http://www.opera.com/addons/ .

Tutorial -How to manually Block advertisement in Opera Web browser
Works a treat and doesn't slow up your browsing. Opera has built in popup blocker and an adblocking feature as well.Using the adblocking feature is as simple as downloading a text file and putting in the right folder.Opera's ad blocking works by referring to a file called url-filter.ini.There are many users who keep regularly maintained list of ad hosts and domains.

First method for Blocking ad in Opera Web Browser..
One of the most famous one and most used ones is Fanboy's Adblock list(www.fanboy.co.nz/adblock/) Click on the install now link or visit www.fanboy.co.nz/adblock/opera/urlfilter.ini.Save the file as it is
to a folder and then move it to C:\document and settings\Your_User_ID\Application Data\Opera_folder\profile.Linux users must copy to the .opera folder.When done,resart the browser and ad blocking will be enabled.Visit the site from time to time to update your adblock
list.

Second method for Blocking ad in Opera Web Browser.

1. Locate your Opera CSS directory; Go to Opera menu, Help, About.
IE: User CSS directory, /home/orakk/.opera/styles/user/

2. Close Opera. In the css directory create a blank file called
"adblock.css" or anything else you'd like to name it .

3. Now go to Ad Blocking FiltersetP at userstyles.org, click
the button "Show Code" and copy everything into "adblock.css"
Save and close the file.
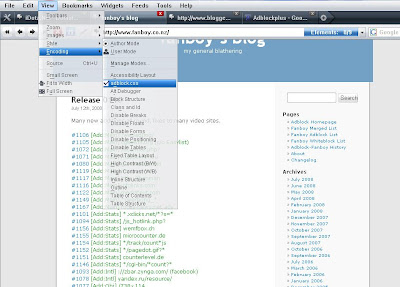
4. Open Opera and then select "View-->Styles-->adblock.css"
More Tutorial- How to create password Reset Disk in Window Xp.
2.Create Your Own Mobile Wap Site.
3.How to Make Multi Boot CD.

Do-It-all discs--How can I make multi-boot CD

How can I make multi-boot CD with Windows XP Professional
and Media Center Edition?

You can use a tool such as Easyboot from Www.ezbystems.com
to create multi-boot CDs of different Windows versions.
Remember that it is illegal to do so unless both versions
of Windows are legal.Here are the steps to add Windows XP.


Create a folder named XPPR under C:\easyboot\disk1.Copy 
the files win51 and win51p from the root directory of 
the XP CD to c:\easyboot\disk1.copy the i386 folder to 
c:\easyboot\disk1\XPPR.copy wxp.bat from 
c:\easyboot\resource to c:\easyboot\disk1\XPPR and run
it.Copy w2ksect.bin from c:\easyboot\disk1\ ezboot to a
new named xppr.bin.

Start Easyboot,select Tools >Replace Text, browse 
to c:\easyboot\disk1\ezboot\xppr.bin, and specify i386
as Text to Replace,XPPR as Replace to,and click 
Replace;one occurrence should be replaced.Repeat this
for c:\easyboot\disk1\xppr\setupldr.bin,replacing i386 
by xppr;four occurrences should be replaced.Open 
c:\easyboot\disk1\xppr\txtsetup.sif in Notepad,search
for SetupSourcePath, and change SetupSourcePath = "\" to 
SetupSourcePath = "\XPPR".Set the menu item's command
as run xppr.bin.save the file.
Repeat these steps to add more version of Windows,but
make sure that you use a different name for the folder
XPPR and the file xppr.bin.After you've prepared the 
content,save.the compilation by clicking save.Click 
Make ISO,select the name and location of the 
place to save the ISO image file to,and click Make.


How to Enable multiple logins in yahoo messenger


Follow the step which are given below and get some fun with
multiple login.

1. Open the Registry Editor by clicking on start > Run and
     entering regedit.

2. Navigate to HEKEY_CURRENT_USER\Software\Yahoo\
    pager\Test

3. Right click on any blank space in the right column and choose
    New Dword Value.

4. Call it "Plural".

5.Double click and assign a decimal value of 1.
      
 Now close the Registry editor and resart Yahoo! Messenger,and
 you'll have multiple logins.
(This does not work with version 9,though).

Create your own wap site.


TagTag.com(web 2.0 site)

Ever tried building a WAP site for yourself? The best place to make
those swanky little sites that load off mobile phones, of the type
you’ve always wanted to make, is at TagTag.com. A name synony-
mous with WAP sites, TagTag.com is the one-stop shop for all your
WAP-site-building needs.An online, Java-based WAP site builder
can be accessed from the site. Once you’ve created an account, you
can browse through the 20,000-odd members’ WAP sites hosted at
TagTag.com. You can visit your new WAP site at http://tagtag.com/
[username]. It is then tagged under a specific section such as
“games” or“personal pages”—you get to choose from 21 other cate-
gories. The WAP site maker has a simple graphical interface, like
the type you see when composing ane-mail: it lets you change the
background image and colours on the site. You can add hyperlinks
and images, and make an unlimited number of pages, too. There’s no
need to learn to code in WAP,WML, or XHTML. Each WAP site is
allotted 1 MB of Webspace, which should allow you to host approxi-
mately 30 full ringtones, for instance. TagTag.com offers a free WAP
emulation browser called TTemulator, which can be used from a PC
to access WAP sites. This application can be added to pages of other
Web sites too.

FAST SHUTDOWN XP


If an application shutdown, xp wiil normally wait for for a while to
see if open application shut down safely.
Use this hack to shutdown straightway and not wait for any
response from the application.

NAVIGATE TO: HCU\CONTROL PANEL\DESKTOP
AND TO: HKEY_USERS\.DEFAULT\CONTROL PANEL\DESKTOP

The key is user-specific,and the second is system-wide .In both
these location, changes the string value called AUTOENDTASKS
to 1 to kill the application immediately, or 0 to prompt for user action .WAITTOKILLAPPTIMEOUT control the default time, in
milliseconds, before killing the application.Reduce this time to
further speed up the process.

How to Create a Password Reset disk for XP


create a password reset disk for XP,and use it if you lose your password

SOLUTION:-

There’s something called the Forgotten Password Wizard, which allows you to create a
password reset disk that can be used to recover password and personalised computer
settings if the password is forgotten. The steps to perform the task differ for domain
and work-group scenarios.

If your computer is on a domain, you can create the Domain Password Reset Disk
as follows. Press [Ctrl] + [Alt] + [Delete] to open the Windows Security dialog box.
Click Change Password. Click Backup to open the Forgotten Password Wizard. Click
Next, then follow the on-screen instructions.

If your computer is not part of a domain, you can create a Non-Domain Password
Reset Disk; the procedure here varies depending on whether you have an administrator
account or a limited account.

If you have an administrator account,create an Administrator Password Reset Disk:open
User Accounts in the Control Panel.Select the Administrator. Click Prevent A Forgotten
Password under Related Tasks.Follow the instructions in the Forgotten Password Wizard.
For a Limited Account Password Reset Disk, do the same, but by selecting the Limited
User Account instead of Administrator.

Here’s how to use the Password Reset Disk to log on to a computer: boot through the
disk you created. Click the username whose password is on the recovery disk.
Press [Enter] or the Right Arrow. This causes the “Did You Forget Your Password?”
message to appear. You can click the “?” button to see your password hint. If
you have forgotten this as well, you can useyour Password Reset Disk to reset your
password. This will start the Password Reset Wizard.Follow the instructions and you
will be able to set a new password. The Password Reset Disk is also automatically
updated with the new password information, so you don’t have to create a new password
reset disk.

Note that the disk you create can only be
used with the computer on which it was created.

IF YOU LIKE IT PLEASE SUBSCRIBE IT VIA EMAIL.

Automatic Window Refresh

Automatic Window Refresh
Normally,there is small delay after some information changes before it reflects in the Gui.
if you need to see the information right away,you would need to press [F5].the following will
enable the system to do faster updates.

Navigate to: hlm\system\currentcontrolset\control\updates

for faster updates,changes the Dworld value called updatesmode to 0.The defaults is 1.

QA reboot will be reguired for the changes to take effect.Note that there is a likelihood of the changes to take effect.
note that there is a likelihood of conflict if this setting is applied with system policies
running:the UpdatesMode value is used by system polies to disable,automatically or manually
check for a connection to the NETLOGON share of a domain controller.Changes it back to the
default if you are running system policies or are connected to a domain controller.
DO IT YOUR OWN RISKS.
IF YOU LIKE IT PLEASE SUBSCRIBE IT VIA EMAIL

VISTA TIPS


You can’t say that the reign of Windows XP is finally over but you can
certainly say that the reign of Windows Vista has just begun. I guess its
time to discover new tips and tricks related to the new Windows Operating
System rather than digging out the old ones which were related to Windows XP.
Windows Vista is new and needs tweaking and pampering so here are some exclusive
Windows Vista tips for you that can help you get a more dynamic Vista experience.

Disable UAC (User Account Control)

To disable those annoying action confirmation popups in Windows Vista you need
to disable UAC (User Account Control). To do that

1. Open Control Panel
2. Type “UAC” in search box and open it
3. Uncheck the box that says “Use User Account Control (UAC)” and restart

Have Two Windows on the Screen Simulataneously

You can have two application windows open at the same time side by side if
you just follow the trick

1. Open an application window
2. Open an another application and hold CTRL
3. Click the application window you want it to title with
4. Choose the desired Style

Flip Windows in 3D (Alt+Tab alternative)

In Windows XP there was a simple and fast trick (Alt+Tab) to easily switch
between applications but in Windows Vista there is a Flip 3D feature which
lets you switch been application Windows in 3D environment.

Just Hold Windows Start Key+Tab to perform this cool and useful effect.

Change Functionality of Start Menu Power Button

You can easily change the functionality of the Start menu power button in Windows Vista.
Just follow the simple steps

1. Go to Control Panel
2. Switch to Category view
3. Click System and Maintenance
4. Under Power Options click “Change what the power buttons do”
5. Set up the actions accordingly and Save changes

Use Check Boxes to Select Multiple Files (CTRL alternative)

Instead of using CTRL to select multiple files at once you can use the check box
feature in Windows Vista to do the same job. Can be useful if your keyboard goes
bye bye for some reason and you need to select multiple files urgently

1. Open Start menu and click Computer
2. Click Organize and choose Folder and Search Options
3. Click the View tab
4. Check “Use Check Box” Setting to activate this feature
5. Hover over file names or thumbnails to see the Check Boxes

Change Volume Level of each Indivisual Application

You can change the Volume Level of each Indivisual Application in Windows Vista
and it is very easy to do

1. Open the application window and highlight to set it as active
2. Right click the speaker sound icon in taskbar
3. Click “Open Volume Meter”
4. Use the “Applications” Volume bar to change the volume of active application
window

Set Multiple Clock Time Zones

Windows Vista gives you the ability to set multiple clock time zones at once
and here is how to do it

1. Right click time icon in taskbar
2. Select Adjust Date/Time
3. Select “Additional Clock” Tab
4. Check the box and set your desired date/time

The time zones will be shown in tooltips

Use Flash Memory to Boost Performance

IF YOU LIKE IT PLEASE SUBSCRIBE IT VIA EMAIL